Source:Google.com.pk
Pencil Drawing Tutorials Biography
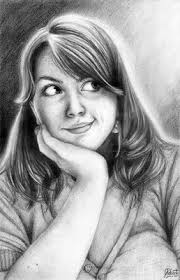
Our Pencil Portrait lesson explains and illustrates the step by step drawing techniques involved in creating the above portrait of a young girl.
The general proportions of a head that we outlined on previous pages are ideal for drawing realistic heads from your imagination. They are also a good reference if you feel that you are making major errors in your portraits.
However, when you draw a portrait from life, a more accurate approach to drawing is needed. You need to record the subtle variations of the features which make that individual's face unique. Such an approach was used to build our pencil portrait above.
There are three basic stages in the creation of this image:
1. Using line drawing to organise the position, shape and proportion of the features.
2. Using softly shaded tone to create the form and texture of each feature.
3. Using larger areas of tone to unite all the elements of the portrait.
Pencil Portrait Step 1
Establishing the basic features
Most artists make the greatest number of changes at the start of a drawing. Therefore it is important to draw lightly at first, as lightly drawn lines are easier to erase.
You begin a portrait with the eyes as they are the main focal point. Take care where you choose to position them on the page as this will affect the overall balance of the portrait. Mouse over the image above and you will see that right eye is situated on the vertical centre of the page. This is a strong compositional starting point for a three quarter view portrait.
The size and position of the other features are directly related to the scale and placement of the eyes.
If you get the correct relationship between the eyes, nose and mouth, you will end up with a good likeness.
Pencil Portrait Step 2
Building the outline of the portrait
The next step is discover the size of the head by establishing the distances between the eyes and the top of the head and the eyes and the chin. Note that these measurements should be similar.
The main features are then framed by the outline of the face and hair, while the neck and shoulders form an angular support for the head. The hairline on the right side of the face creates a sweeping curve as it meets the neckline of the t-shirt. This movement builds a strong visual link between the head and shoulders.
At this stage, the drawing is no more than a set of carefully measured features that establish the final proportions of the portrait.


Pencil Drawing Tutorials Biography
Our Pencil Portrait lesson explains and illustrates the step by step drawing techniques involved in creating the above portrait of a young girl.
The general proportions of a head that we outlined on previous pages are ideal for drawing realistic heads from your imagination. They are also a good reference if you feel that you are making major errors in your portraits.
However, when you draw a portrait from life, a more accurate approach to drawing is needed. You need to record the subtle variations of the features which make that individual's face unique. Such an approach was used to build our pencil portrait above.
There are three basic stages in the creation of this image:
1. Using line drawing to organise the position, shape and proportion of the features.
2. Using softly shaded tone to create the form and texture of each feature.
3. Using larger areas of tone to unite all the elements of the portrait.
Pencil Portrait Step 1
Establishing the basic features
Most artists make the greatest number of changes at the start of a drawing. Therefore it is important to draw lightly at first, as lightly drawn lines are easier to erase.
You begin a portrait with the eyes as they are the main focal point. Take care where you choose to position them on the page as this will affect the overall balance of the portrait. Mouse over the image above and you will see that right eye is situated on the vertical centre of the page. This is a strong compositional starting point for a three quarter view portrait.
The size and position of the other features are directly related to the scale and placement of the eyes.
If you get the correct relationship between the eyes, nose and mouth, you will end up with a good likeness.
Pencil Portrait Step 2
Building the outline of the portrait
The next step is discover the size of the head by establishing the distances between the eyes and the top of the head and the eyes and the chin. Note that these measurements should be similar.
The main features are then framed by the outline of the face and hair, while the neck and shoulders form an angular support for the head. The hairline on the right side of the face creates a sweeping curve as it meets the neckline of the t-shirt. This movement builds a strong visual link between the head and shoulders.
At this stage, the drawing is no more than a set of carefully measured features that establish the final proportions of the portrait.
Pencil Drawing Tutorials
Pencil Drawing Tutorials
Pencil Drawing Tutorials
Pencil Drawing Tutorials
Pencil Drawing Tutorials
Pencil Drawing Tutorials
Pencil Drawing Tutorials
Pencil Drawing Tutorials
Pencil Drawing Tutorials
Pencil Drawing Tutorial
Drawing Tutorial - Pencil Basics
No comments:
Post a Comment