Sour ce:Goolge.com.pk
Pencil Shaded Drawings Biography
Graduated tone can be used to create the illusion of space and form in a drawing. It is a very useful skill to develop.
Use a B, 2B, or darker grade of pencil for your shading. Lighter grades (H, 2H etc.) will not give enough depth to your darkest tones.
Just start by shading the area you wish to be dark and slowly build up the tone. As you work towards the light, gradually ease the pressure on your pencil until you can no longer the mark it makes. You then patiently repeat this process, building a depth to the shading, adjusting any irregular areas and trying to keep the tonal changes as smooth as possible until you achieve the intensity of tone that you desire.
Below are some more exercises of increasing difficulty which will test your shading skills to the limit.
For this shading tutorial I will explain several different techniques on how to shade. Proper shading is important in drawing realistically. Good shading textures and tonal flow can add a lot to a drawing.
I buy all of my supplies from Blick Art Materials . Buying your stuff from that link helps me keep adding to this site.
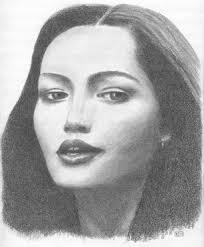
Blended Shading- a popular shading method among pencil artists. Graphite is a wonderful medium because it's very workable. You can lay down graphite and then blend it with pretty much anything. This shading method consists of just scribbling some graphite onto your paper. Now the graphite is blended. I've had good results using regular facial tissues. You can blend with anything though. Play around with different materials to create different shade textures. Facial tissues yield very smooth shading, perfect for flawless looking skin.
(blended shading example)
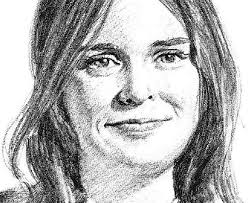
Circulism- this is a very popular shading method among artists. The idea is to draw very tiny circles that overlap and intertwine. Building up tone can be tedious but the results are worth it. This shading method is great for rendering a realistic skin texture. Use a light touch and build up tone.
(circulism shading example)
Blended Circulism- graphite is scribbled onto the paper just as in the last method. Using a blending stump, the graphite is blended in small circular motions. This shading method is also great for skin textures.
(blended circulism shading example)
Dark Blacks- alot of people have trouble getting a dark black. Honestly, black is not really an option with graphite. If you want dark blacks, try using charcoal. For a dark tone with graphite, take a SHARP 7B pencil. Pressing fairly hard and using the circulism technique, apply the graphite to the paper. Anytime you are dealing with dark tones and graphite, there will be a shine that results. This happens because the tooth of the paper absorbs the graphite quickly and there are extra layers left on top. Glare/shine is a reality when working with graphite. One way to diminish glare is to spray your drawing with a fixative when it is completed. I would recommend using Winsor and Newton Workable Fixative. I've had bad experiences with other products. Also, remember that if you are framing the drawing, shine will be lessened once it is behind glass.
(black shading example)
Loose CrossHatching- if you've drawn anything before, you've probably already used this shading method. It's simple yet effective. I think it is very artistic looking too. The basic idea of crosshatching is to overlap lines. Start by drawing a set of diagonal lines next to eachother. Then rotate your drawing 90 degrees and draw another set of diagonal lines that overlap the first set. This can be repeated numerous times to build up tone. Crosshatching can be as tight or as loose as you want it to be.
(loose crosshatch shading example)
Tight CrossHatching- using the ideas from loose crosshatching, this shading method takes it a little further. Tone is built up through repetition and a soft touch. This shading method works really well for animal fur I've found. It's not perfect and some paper tooth will show through.
Shading with Colored Pencils- colored pencils can be frusterating to work with. I struggled with them for a while until I tried shading with circulism. It really helped my colored pencil work alot.
Shading with Pastels- shading is fairly easy with pastels. Since they are such a soft medium, blending them is not a problem at all. Scribble some pastel pigment onto the paper. Using a q-tip (or earbud as some people call them) smear the pigment into the paper.


Pencil Shaded Drawings Biography
Graduated tone can be used to create the illusion of space and form in a drawing. It is a very useful skill to develop.
Use a B, 2B, or darker grade of pencil for your shading. Lighter grades (H, 2H etc.) will not give enough depth to your darkest tones.
Just start by shading the area you wish to be dark and slowly build up the tone. As you work towards the light, gradually ease the pressure on your pencil until you can no longer the mark it makes. You then patiently repeat this process, building a depth to the shading, adjusting any irregular areas and trying to keep the tonal changes as smooth as possible until you achieve the intensity of tone that you desire.
Below are some more exercises of increasing difficulty which will test your shading skills to the limit.
For this shading tutorial I will explain several different techniques on how to shade. Proper shading is important in drawing realistically. Good shading textures and tonal flow can add a lot to a drawing.
I buy all of my supplies from Blick Art Materials . Buying your stuff from that link helps me keep adding to this site.
Blended Shading- a popular shading method among pencil artists. Graphite is a wonderful medium because it's very workable. You can lay down graphite and then blend it with pretty much anything. This shading method consists of just scribbling some graphite onto your paper. Now the graphite is blended. I've had good results using regular facial tissues. You can blend with anything though. Play around with different materials to create different shade textures. Facial tissues yield very smooth shading, perfect for flawless looking skin.
(blended shading example)
Circulism- this is a very popular shading method among artists. The idea is to draw very tiny circles that overlap and intertwine. Building up tone can be tedious but the results are worth it. This shading method is great for rendering a realistic skin texture. Use a light touch and build up tone.
(circulism shading example)
Blended Circulism- graphite is scribbled onto the paper just as in the last method. Using a blending stump, the graphite is blended in small circular motions. This shading method is also great for skin textures.
(blended circulism shading example)
Dark Blacks- alot of people have trouble getting a dark black. Honestly, black is not really an option with graphite. If you want dark blacks, try using charcoal. For a dark tone with graphite, take a SHARP 7B pencil. Pressing fairly hard and using the circulism technique, apply the graphite to the paper. Anytime you are dealing with dark tones and graphite, there will be a shine that results. This happens because the tooth of the paper absorbs the graphite quickly and there are extra layers left on top. Glare/shine is a reality when working with graphite. One way to diminish glare is to spray your drawing with a fixative when it is completed. I would recommend using Winsor and Newton Workable Fixative. I've had bad experiences with other products. Also, remember that if you are framing the drawing, shine will be lessened once it is behind glass.
(black shading example)
Loose CrossHatching- if you've drawn anything before, you've probably already used this shading method. It's simple yet effective. I think it is very artistic looking too. The basic idea of crosshatching is to overlap lines. Start by drawing a set of diagonal lines next to eachother. Then rotate your drawing 90 degrees and draw another set of diagonal lines that overlap the first set. This can be repeated numerous times to build up tone. Crosshatching can be as tight or as loose as you want it to be.
(loose crosshatch shading example)
Tight CrossHatching- using the ideas from loose crosshatching, this shading method takes it a little further. Tone is built up through repetition and a soft touch. This shading method works really well for animal fur I've found. It's not perfect and some paper tooth will show through.
Shading with Colored Pencils- colored pencils can be frusterating to work with. I struggled with them for a while until I tried shading with circulism. It really helped my colored pencil work alot.
Shading with Pastels- shading is fairly easy with pastels. Since they are such a soft medium, blending them is not a problem at all. Scribble some pastel pigment onto the paper. Using a q-tip (or earbud as some people call them) smear the pigment into the paper.
Pencil Shaded Drawings
Pencil Shaded Drawings
Pencil Shaded Drawings
Pencil Shaded Drawings
Pencil Shaded Drawings
Pencil Shaded Drawings
Pencil Shaded Drawings
Pencil Shaded Drawings
Pencil Shaded Drawings
Pencil Drawing And Shading
Pencil Drawing Shading
No comments:
Post a Comment